
DISCS (Drive Image Suspend Cloud Service)

DISCS is a new feature of BrakeCODE that allows you to seamlessly suspend cloud compute instances to disk in order to save on cloud vendor cost. This service is useful for instances that don't need to run 24/7 yet are ones that would benefit from maintaining state (vs rebuilding completely via infrastructure tools such as Ansible, Packer, Terraform... ) Some cloud providers do not charge directly for powered down instances (AWS, GCP) although they do charge for attached resources to those instances, such as IP addresses and storage. Other vendors such as Digitalocean, Linode, Vultr, and more do charge for stopped instances.[1] This post will describe in detail what DISCS can do, how to use it, and how it can save you or your company money if you're using the aforementioned vendors (Digitalocean is currently supported).
Give it a try now at BrakeCODE.com and get a $100 DigitalOcean credit with the link below...

First Things First
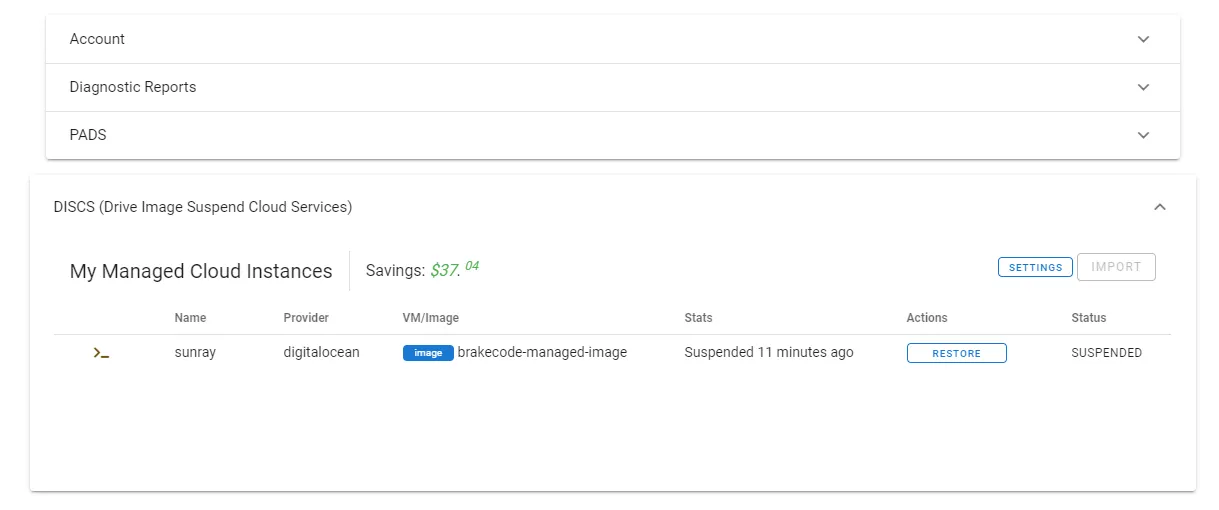
So first of all make sure you already have an account at brakecode.com (it's free and simple to create one). Once you have an account you can go to your dashboard where you'll find an expandable panel for the DISCS service.
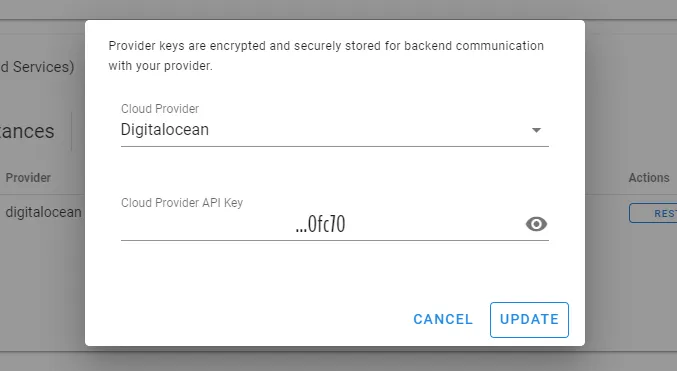
The first step in using DISCS is to supply an API key from your cloud provider in this case the provider being Digitalocean. Currently Digitalocean does not yet provide very granular API keys (read more about it here) and the ones they do provide are very powerful (i.e. can destroy your entire environment). It's for this reason that I suggest having an entirely separate account for development instances and/or whatever instances you plan on using with this service. Of course extra care has been made to ensure that the service is both secure and reliable and that only instances imported into DISCS will be affected, however with great power comes great responsibility, and having the keys to your entire environment outside of the instance you are importing isn't one we want to be obliged to. That said, this is how we've ensured that your API keys are secure and your infrastructure secure as well... The first step in using DISCS is to supply an API key from your cloud provider in this case the provider being Digitalocean.
Security
All 3rd party (cloud provider) imported keys are stored on the backend using Vault, and keys are never transmitted back to you once imported. Only the last 5 digits are ever sent in response to client requests for purposes of user key validation.
Further the provider key is used in two ways on the backend. Once upon import and then each time an instance is updated (suspended, restored, destroyed, etc). When the key is imported a direct API call is made to the cloud providers billing history endpoint which in part serves as a key validation method, and secondly to verify vms/images, both of which use idempotent safe GET method calls. All other API calls are made via the official Digitalocean provider plugin to Terraform, which does much of the heavy lifting.
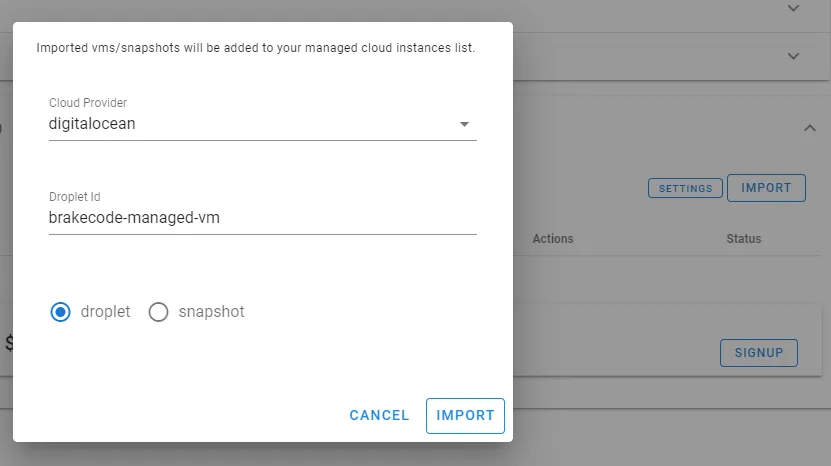
So once you're provider key has been saved, you can then import your first virtual machine or image (vm/image) into DISCS. The instance in either form must already exist or be created as DISCS does not have the ability to create or destroy instances outright (only as a side affect of suspending/restoring). In other words suspending a vm will cause an image to be created and the vm instance to be destroyed afterwards, after verification of successful image creation. Conversely, restoring a vm instance will cause the associated image, to be destroyed. A conscience decision to limit DISCS in this way was made to ensure intent.
Suspending an Instance
Clicking the import button will bring up a dialog which allows you to indicate the cloud provider, whether you are importing a vm/image, and what the name of that vm/image is. After submission of the job, a job log will show in the UI indicating the jobs progress. Suspending an image is made up of 3 general steps which are:
- Image (snapshot) creation of the vm
- Image verification to ensure the image can successfully be restored
- VM deletion once it is safe to do so
Again Terraform performs the operations on the backend and while it's likely safe enough to trust the output from Terraform, additional "out of band" checks are made using the provider API directly to verify the vm/image creation success, even when Terraform has itself come back with a successful response and no error code. Obviously this is done to ensure that the instance is not lost entirely due to deleting an image where no vm exists or vice versa.
As the job progresses, the progress can be viewed by clicking the terminal icon which will cause the job log to dropdown as shown:
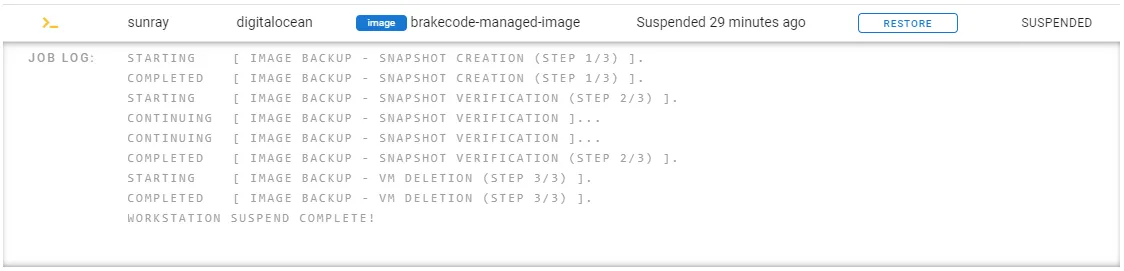
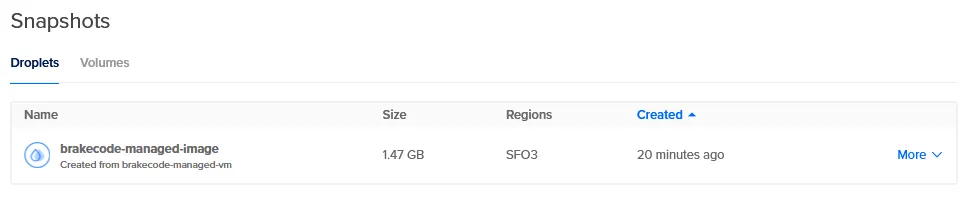
When the job is complete, you'll get a message stating as much and then the UI will update to show image data where vm data once was, detailing information such as image size, suspend time, status, etc. Checking back at your provider dashboard you will find that the vm has been destroyed and an image created in its place.
Restoring an Instance
Moving to the restoration process, things look very similar but in reverse:
- VM creation from the image
- VM verification to ensure the vm was really successfully created
- Image deletion once it is safe to do so
Once the instance is restored, the instance will be in a state no different from powering the vm down and back up again, the only difference being in the cost savings from not being billed for that time. The UI will again show the log of the restore process in the dropdown as well as vm details and status of the vm.

Also a point of note that has to do with suspending images... you will notice that the suspend button is disabled after a restore. This is due to the fact that powering down the vm manually is required beforehand to ensure data consistency.

The image storage cost is minuscule compared to the cost of running the instance.
Details
Tainted instances
Tainted instances... what are they? Well following the paradigm of Terraform which DISCS is built on, when the state of your managed instance is inconsistent with that of your cloud provider, the instance is marked as tainted. When this happens you can remove the tainted resource or attempt to recover it from your cloud providers dashboard/API/etc.

One example of a resource becoming tainted and then restoring it would be to rename a resource which is under DISCS management. Shortly after renaming the service you would notice the instance being marked as tained and the UI updating. Then upon renaming it back to the name it was given when imported, you'll see that the resource status is no longer marked as tainted.
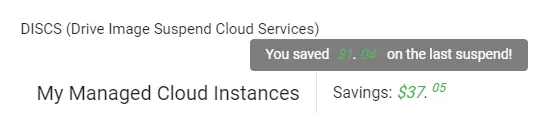
Immediate accounting
Along with keeping a running tally of total amount saved using DISCS, each time you restore an instance, you'll be able to see how much you saved on that particular suspension.
Sunray?
The Sunray name is a throwback to the days of Sun Microsystems and their Sun Ray thin-client machines. Many hours were logged behind the use of these machines, and considering the concept is slightly similar to remote development on cloud instances, the name stuck.

Although each managed instance will have it's own vm/image name established by the cloud platform, each instance also get's named by DISCS. Naming while having little value now, will help when/if multiple instances are ever supported.
What are the costs you ask?
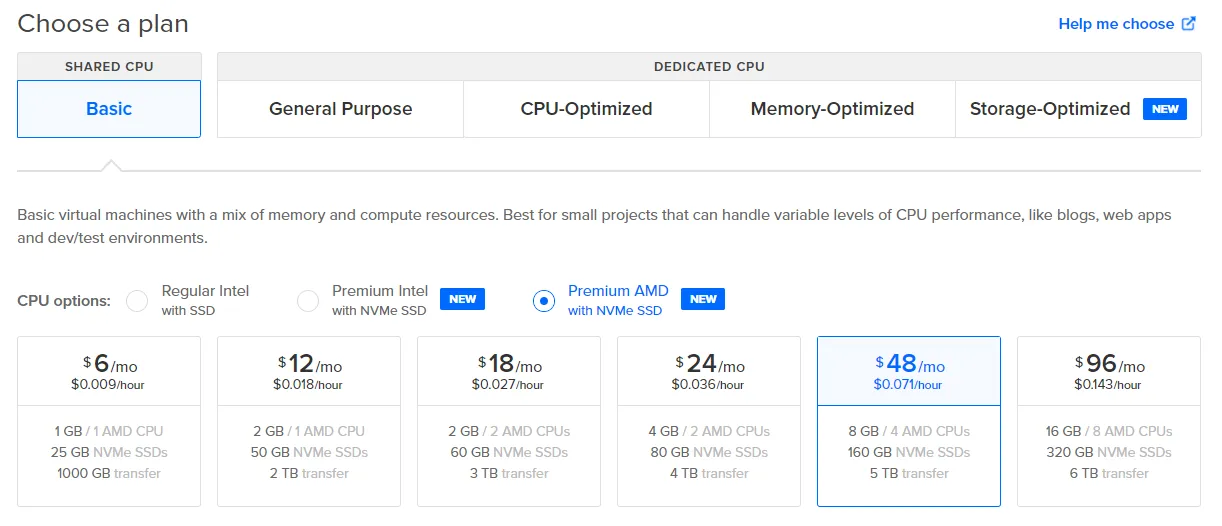
Well the cost for each cloud provider will obviously differ but since we are using Digialocean, here's the cost breakdown for a Basic $48/mo Droplet, assuming a usage of 8 hours per day, all units of time being in hours unless otherwise indicated:
Snapshot Rate = 0.05/GB/mo = 6.849315068493151e-5/GB/hr
Savings/day = (hrs Suspended x Droplet Rate) - (hrs Suspended x Snapshot Rate)
Savings/day = (16 x $0.071) - (16 x $6.849315068493151e-5 x 80GB)
Savings/day = $1.136 - $0.0876712328767123 = $1.048328767123288
Savings/mo = $1.048328767123288 * 30days = $31.44986301369863
Saving/yr = $31.44986301369863 * 12months = $377.3983561643836
Not bad!
Conclusion
Before DISCS these steps were done manually and of course it was somewhat tedious and a bit time consuming (generally takes 5-15 minutes or longer to write out the disk image) as well, it seems one would always forget to delete the image after restoring from it. And again, although the cost for image storage is minimal compared to running the instance, the fact that resources were being wasted was still a bother. Now using this service one is able to perform all of those steps with a single click and be certain that resources are never existing for no reason. Additionally, DISCS keeps a running total of savings which is helpful. Currently the DISCS service is free to use and will have a sliding scale cost of it's own which should not exceed 50% of the savings mentioned above and be as low as 10% based on monthly spend... still leaving one with a healthy net savings.